Introduction
Every process on your OS is executed from an application code and each process can interfere in other process’s resources. The OS or the VM (if there is any) can provide some security and isolation mechanisms, however it can be different for each OS type and impose difficult configuration.
Docker provides a layered architecture for contents of the application(s), called an Image, and a virtual environment, called a Container, for running process(s) of the application(s). This virtual environment is isolated by
- memory
- storage (similar to a hypervisor)
- network (similar to a hypervisor)
The image has a layered architecture, each layer contains the differences between the preceding layer and the current layer, and on top of the layers, there is a writable layer (the current one) which is called the container layer1.
As mentioned above, there are some similarities between Docker and a hypervisor in providing isolated resources. The most important difference is their focus and application. If you want a full-fledged OS, the hypervisor is the solution, and if you want a light-weight isolated virtual environment for your process(s), Docker is the answer. For example, if you want to run a MySQL server, Docker is the best choice, and if you want to execute a simulation app with GUI, virtualization is the only choice.
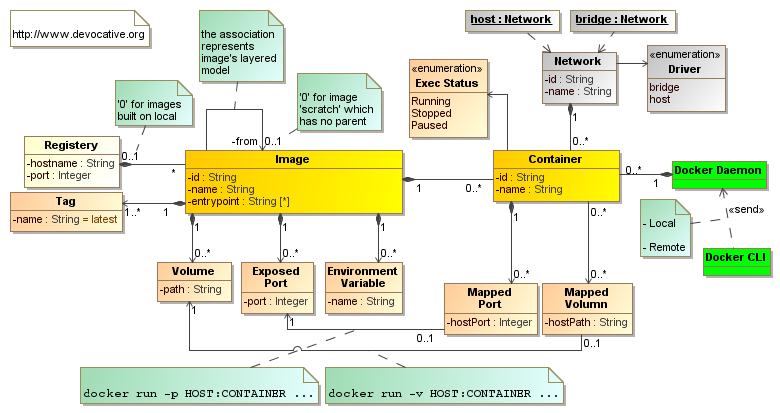
The following class diagram illustrates the overall parts involved in Docker installed on your box. The associations show the relations between these parts and multiplicity of each association end highlights the detail of that end in the relation.
In a simple story, a container is started by the docker daemon, initiated by the docker client (command):
- At first, the image is downloaded from the registry if not already downloaded
- Docker can create one or another independent container from one image
- During container startup, Docker executes the command(s) provided in the image or passed as input parameters
- Docker initializes the container’s network interface and attaches it to one of its virtual networks due to startup parameters (example), and even open a port on the host binding it to one of container’s internal process
- Docker may mount a file/directory to its internal file/directory due to startup parameters
Container(s) can be created and started via one of following ways
| App | Host/Node | Container |
|---|---|---|
docker |
single | various unrelated containers |
docker-compose |
single | using single config file for multiple related containers or same-image containers for load balancing |
| Docker Swarm or Kubernetes | multiple | large deployment and centralized management for lots of containers |
This post only uses docker.
Installation
Docker is presented in two editions: CE (community edition) and EE (enterprise edition). Most of the time, people use its CE and also in the case of this tutorial.
The installation is different due to your OS. So the best reference is the Docker site.
- Debian
- Ubuntu
- Windows
- Note: There is a general installation script for Linux distributions -
sudo curl -sSL https://get.docker.com | sh
After installation
- In Linux, by default only
rootuser can executedockercommand. Adding groupdockerto a user’s groups, the user has access to Docker. So executeusermod -a -G docker USER. - Executing
ifconfigin your Linux box,docker0must be in the list of network interfaces.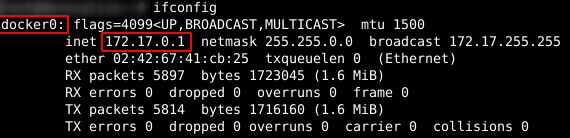
Docker CLI
After installing Docker, the docker command must be in your path and can be executed from your OS CLI app.
Following table shows some common usages of docker command.
| Command | Description |
|---|---|
docker version |
Show version information of installed Docker client and server |
docker image ls |
List of image(s) on your host |
docker image inspect IMAGE |
Display detailed information on the image |
docker image pull IMAGE |
Download the image from a registry |
docker image rm IMAGE |
Remove the image from local |
docker image save IMAGE -o FILE |
Save one or more images to a tar archive |
docker image load -i FILE |
Load an image from a tar archive |
docker container ls |
List running containers |
docker container ls -a |
List all containers |
docker container stats |
Display a live stream of container(s) resource usage statistics |
docker container run IMAGE |
Download the image, if not already downloaded, and start a container from it |
docker container top CONTAINER |
Display the running processes of a container |
docker container inspect CONTAINER |
Display detailed information for a container |
docker container exec CONTAINER |
Execute a command inside the container |
docker container logs CONTAINER |
Display logs of the container |
IMAGE- each image has a specific name to be addressed on a registry. On Docker Hub, the simple form ofIMAGEis:REPONAME[:TAG]TAGis optional and its default value islatest. However, defining a specific tag is highly recommended to assure you about the version of the used image. Some examples aremysql:5.7,openjdk:8u191-alpine,redis:5.0.4-stretch, and etc.The general form of
IMAGEon a registry server is2:[[HOSTNAME[:PORT]/]USERNAME/]REPONAME[:TAG]CONTAINERrefers to the name or id of a container
Note: as stated in the previous table, the following command shows three popular information of an IMAGE.
In MySQL section, details of the following command is described as an example.
docker image inspect -f '{{println "VOL =" .Config.Volumes}}{{println "ENV =" .Config.Env}}{{println "PORTS =" .ContainerConfig.ExposedPorts}}' IMAGE
Configuration
You can config docker daemon via /etc/docker/daemon.json. A common snippet is as follows:
1
2
3
4
5
6
7
8
{
    "insecure-registries" : ["REG1[:PORT]", "REG2[:PORT]"],
    "log-driver": "json-file",
    "log-opts": {
        "max-size": "100m",
        "max-file": "3"
    }
}
Real Examples
Lets start real and practical examples.
MySQL
- Reference Docker Hub
- Image Information
docker image inspect -f '{{println "VOL =" .Config.Volumes}}{{println "ENV =" .Config.Env}}{{println "PORTS =" .ContainerConfig.ExposedPorts}}' mysql:5.7VOL = map[/var/lib/mysql:{}]it has a volume entry on /var/lib/mysqlinside the containerENV = [...]list of defined environment variables PORTS = map[3306/tcp:{} 33060/tcp:{}]exposed ports to be bound on the host - Starting container
docker container run -d -v /opt/docker/mysql:/var/lib/mysql -p 3306:3306 -e MYSQL_ROOT_PASSWORD=root --restart=always --name MySQL mysql:5.7-dthe container is detached and executed in background -v /opt/docker/mysql:/var/lib/mysqlHOST :CONTAINER for mapping volume, so/var/lib/mysqldirectory of container is mapped on/opt/docker/mysqldirectory of host-p 3306:3306HOST :CONTAINER for binding ports-e MYSQL_ROOT_PASSWORD=rootassign value rootto environment variableMYSQL_ROOT_PASSWORD, so the password of root user in mysql is set toroot--restart=alwayson next host reboot or power-on, the container starts automatically (like services in Windows) --name MySQLMySQLis assigned as the name to this container to be addressed easily (CONTAINERin above table, is this name).
note: this name also used as network name for the containermysql:5.7the IMAGEreference - Calling mysql client CLI
docker container exec -it MySQL mysql -uroot -proot-it(i.e.-i -t)-i: Keep STDIN open even if not attached-t: Allocate a pseudo-TTYmysql -uroot -prootthe command and its arguments executed inside the container - Watching logs of mysql server
docker container logs -f MySQL-fit works like tail -fin Linux
Redis
- Reference Docker Hub
- Starting container
docker container run -d -v /opt/docker/redis:/data -p 6379:6379 --restart=always --name Redis redis:5.0.4 redis-server --requirepass PASSWORDredis-server --requirepass PASSWORDpassing custom command to be executed on container startup instead of its default one - Calling redis-cli client
docker container exec -it Redis redis-cli -a PASSWORD
Oracle Database
- Reference Docker Hub (note: click on “Proceed to Checkout”)
- Some official images, like Oracle DB, is available through Docker Store, and they need an account on Docker Hub
- Starting container
docker container run -d -it -p 1521:1521 -v /opt/docker/oradb:/ORCL --restart=always --name OracleDB store/oracle/database-enterprise:12.2.0.1- you need to login to pull this image, so execute
docker loginbefore pulling - the container for Oracle DB needs the
-itswitches, even if it is detached (-d)
- you need to login to pull this image, so execute
- Calling sqlplus client
sys@CDBdocker container exec -it OracleDB /bin/bash -c "source /home/oracle/.bashrc; sqlplus '/ as sysdba'"sys@PDBdocker container exec -it OracleDB /bin/bash -c "source /home/oracle/.bashrc; sqlplus sys/Oradoc_db1@ORCLPDB1 as sysdba"- Oracle 12c introduces a new architecture called multitenant. In this new architecture, a database instance consists of two main sections
- A container, called CDB, which is the basis environment of the instance
- One or more pluggable DBs, called PDB, which is an end-user database for applications (this image has only one PDB)
- The PDB information of this image
- Name is
ORCLPDB1and itssyspassword isOradoc_db1 - JDBC URL -
jdbc:oracle:thin:@localhost:1521/orclpdb1.localdomain
- Name is
Sonatype Nexus
- Reference Docker Hub
- Starting container
mkdir -p /opt/docker/nexus/data
chown -R 200:200 /opt/docker/nexus
docker container run -d -v /opt/docker/nexus/data:/nexus-data -p 8081:8081 -e NEXUS_CONTEXT=nexus --restart=always --name Nexus sonatype/nexus3:3.15.2-e NEXUS_CONTEXT=nexusStart the server with /nexuscontext path (useful for Nginx forwarding)- Test the server -
curl -u admin:admin123 http://localhost:8081/nexus/service/metrics/ping - Visit localhost:8081/nexus, and login with default username
adminand passwordadmin123
- Test the server -
Jenkins Blue Ocean
- Reference Docker Hub
- Starting container
docker container run -d -u root -v /opt/docker/jenkins:/var/jenkins_home -v /var/run/docker.sock:/var/run/docker.sock -p 8080:8080 -e JENKINS_OPTS="--prefix=/jenkins" --restart=always --name Jenkins jenkinsci/blueocean:1.14.0-u rootUsername or UID (format: <name|uid>[:<group|gid>]), so userrootis set as the owner of the process-v /var/run/docker.sock:/var/run/docker.sockAllow jenkins to create a container by calling Docker on your host (Docker-in-Docker) -e JENKINS_OPTS="--prefix=/jenkins"Start the server with /jenkinscontext path (useful for Nginx forwarding)- Visit localhost:8080/jenkins
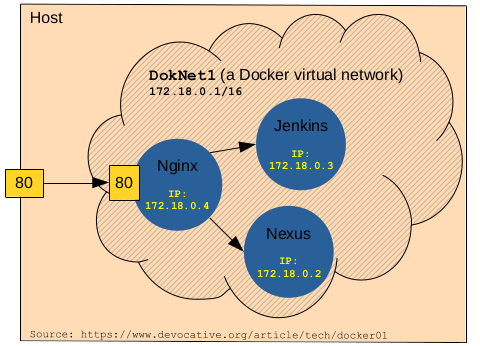
Nginx + Jenkins + Nexus
Lets mix up things and create a little bit advanced example to highlight Docker networking. This practical example can be used as a basis for a CI (continuous integration) environment. Following picture shows the final result of the example (note: the IPs can be different when you execute the example).
The next script implements above picture:
1
2
3
4
5
6
7
8
9
10
11
12
13
14
15
16
17
18
19
20
21
22
23
24
25
26
27
28
29
30
31
32
33
34
35
36
37
38
39
40
41
42
43
44
docker network create DokNet1

mkdir -p /opt/docker/nexus/data
chown -R 200:200 /opt/docker/nexus
docker container run -d \
 -v /opt/docker/nexus/data:/nexus-data \
 --network DokNet1 -e NEXUS_CONTEXT=nexus \
 --restart=always --name Nexus sonatype/nexus3:3.15.2

docker container run -d -u root \
 -v /opt/docker/jenkins:/var/jenkins_home \
 -v /var/run/docker.sock:/var/run/docker.sock \
 --network DokNet1 -e JENKINS_OPTS="--prefix=/jenkins" \
 --restart=always --name Jenkins jenkinsci/blueocean:1.14.0

mkdir -p /opt/docker/nginx
cat > /opt/docker/nginx/nginx.conf << "EOF"
server_names_hash_bucket_size 64;

server {
  listen 80;
  server_name localhost;
  client_max_body_size 80M;
  proxy_http_version 1.1;

  location /nexus/ {
    proxy_pass http://Nexus:8081/nexus/;
    proxy_set_header Host $host;
    proxy_set_header X-Real-IP $remote_addr;
  }

  location /jenkins/ {
    proxy_pass http://Jenkins:8080/jenkins/;
    proxy_set_header Host $host;
    proxy_set_header X-Real-IP $remote_addr;
  }
}
EOF

docker container run -d \
 -v /opt/docker/nginx/nginx.conf:/etc/nginx/conf.d/default.conf \
 --network DokNet1 -p 80:80 \
 --restart=always --name Nginx nginx:1.15.10
- Line 1 - Docker creates a virtual network, called
DokNet1.-
Check it by executing
docker network inspect DokNet1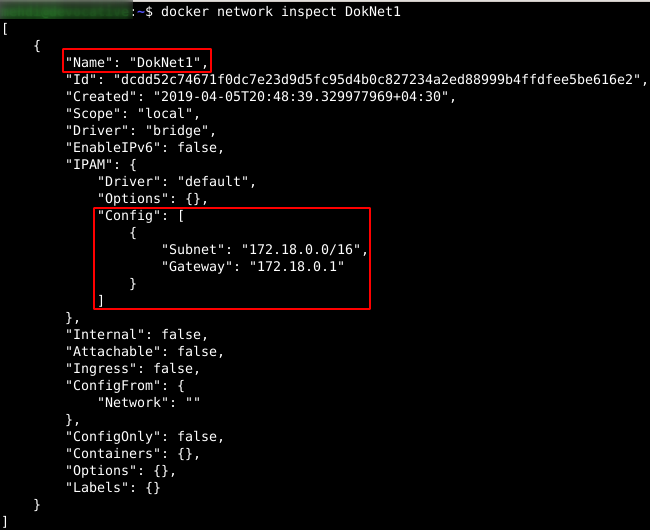
-
After this command execution, a long string is printed on screen which is identifier of this network. Its first 12 characters is also unique and we call it
NET_ID.

-
Executing
ifconfig, it is in the list by the name ofbr-NET_ID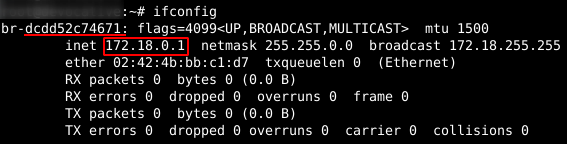
-
- Option
--network DokNet1attaches the container toDokNet1network, so all of the above containers are in the same network (picture). - Lines 17-38 create a config file for Nginx
- Line 27 - Nginx forwards request to Nexus by calling
http://Nexus:8081/nexus/, which restates the fact that containers can access each other by the name in the network. - Line 33 - It is the same as previous line for Jenkins.
- Line 27 - Nginx forwards request to Nexus by calling
- Only Nginx has a binding port. It is not necessary for Jenkins and Nexus to bind ports.
- Accessing web apps
- Jenkins - localhost/jenkins
- Nexus - localhost/jenkins. Executing
curl -u admin:admin123 http://localhost/nexus/service/metrics/pingis another way.
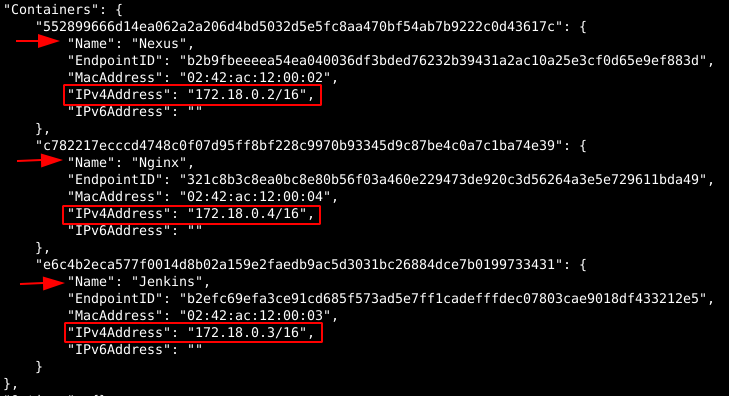
- At the end, execute
docker network inspect DokNet1again. You can see list of containers attached to this network.